Difference between revisions of "Timeline - Setup"
m (added 800px width to images) |
(added TNG version identifiers) |
||
| (8 intermediate revisions by 3 users not shown) | |||
| Line 1: | Line 1: | ||
| + | {| style="margin-right:0.5 em;" align="right" | ||
| + | | __TOC__ | ||
| + | |} | ||
TNG 7.1 adds the following new capability to the Chart Settings: | TNG 7.1 adds the following new capability to the Chart Settings: | ||
| Line 6: | Line 9: | ||
== Default Chart Width == | == Default Chart Width == | ||
| − | TNG 7.1 changed the default chart width for timelines from 500px to 800px. | + | TNG 7.1 changed the default chart width for timelines from 500px to 800px. When you initially access the Timeline Chart within the Chart Settings, the field may be blank but once you save the settings it will change to 800. |
[[Image:Timeline_chart_width_updated.jpg|800px]] | [[Image:Timeline_chart_width_updated.jpg|800px]] | ||
| − | If you are using Template 4 or 7 which have a left nav menu and your primary audience are using screens that are 1024px wide, you may want to change the default from 800px down to '''580px''' to prevent a left/right scroll bar | + | If you are using Template 4 or 7 which have a left nav menu and your primary audience are using screens that are 1024px wide, you may want to change the default from 800px down to '''580px''' to prevent a left/right scroll bar from generating. |
== Simile Timeline == | == Simile Timeline == | ||
| − | The default setting in the new Timeline section of Chart Settings is to not enable the Simile Timeline. So if you want to use the Simile Timeline, you will need to change the option to '''Yes'''. | + | The default setting in the new Timeline section of Chart Settings is to '''not''' enable the Simile Timeline. So if you want to use the [http://www.simile-widgets.org/timeline/ Simile Timeline], you will need to change the option to '''Yes'''. |
[[Image:Timeline_chart_Simile-Timeline_activated.jpg|800px]] | [[Image:Timeline_chart_Simile-Timeline_activated.jpg|800px]] | ||
| Line 20: | Line 23: | ||
Once you change the option to display the Simile Timeline, TNG will display additional options that can be changed. | Once you change the option to display the Simile Timeline, TNG will display additional options that can be changed. | ||
| − | Note that if you do not have any Timeline Events defined, the Simile Timeline will not | + | Note that if you do not have any Timeline Events defined, the Simile Timeline will not add any particular value to your Timeline page as can be seen in the following image. |
[[Image:Timeline_Simile_with-no-additional_events.jpg|800px]] | [[Image:Timeline_Simile_with-no-additional_events.jpg|800px]] | ||
| + | |||
| + | == Simile Timeline Settings from TNG v11 == | ||
| + | |||
| + | {{TNG 11.0|and after}} | ||
| + | === Overview === | ||
| + | There are four moveable (by dragging) "bands" making up the Timeline:<br/> | ||
| + | [[file:Timelinesimile0.jpg]] | ||
| + | <br/><br/> | ||
| + | Band 1: Time overview for personal events. The light area is the "window" for Band 2.<br/> | ||
| + | Band 2: The personal events, the contents of the "window" of Band 1.<br/> | ||
| + | Band 3: The external events, the contents of the "window" of Band 4.<br/> | ||
| + | Band 4: Time overview for external events. The light area is the "window" for Band 3.<br/> | ||
| + | External events are added in Admin >> Setup >> Timeline Events.<br/> | ||
| + | <br/> | ||
| + | '''NOTE''': All settings are modified in the file '''timelineconfig.php'''<br/> | ||
| + | <br/> | ||
| + | |||
| + | === Band and Total heights === | ||
| + | The height of the bands can be set in % of the total height (which is set in Admin >> Setup >> Configuration >> Chart Settings).<br/> | ||
| + | Each band has its _pct variable. The defaults are:<br/> | ||
| + | $band1_pct = "10%";<br/> | ||
| + | $band2_pct = "28%";<br/> | ||
| + | $band3_pct = "47%";<br/> | ||
| + | $band4_pct = "15%";<br/> | ||
| + | If you modify the values: Remember that they should add up to 100%! | ||
| + | |||
| + | === The Timeline timespan === | ||
| + | The width of the Timeline box is the free width of the page. So a wide screen gives many pixels and a narrow one gives fewer.<br/> | ||
| + | You can set how many pixels wide one year is, in bands 2 and 3. The more pixels, the fewer number of years will fit into the box, and vice versa.<br/> | ||
| + | Each band has its own _interval variable. The defaults are:<br/> | ||
| + | $band2_interval = 50;<br/> | ||
| + | $band3_interval = 175;<br/> | ||
| + | <br/> | ||
| + | Regarding the bands 1 and 4 they work different in the way I have examined them.<br/> | ||
| + | More of this below.<br/> | ||
| + | The defaults are:<br/> | ||
| + | $band1_interval = 150;<br/> | ||
| + | $band4_interval = 150; | ||
| + | |||
| + | === Displayed year indices === | ||
| + | You can set the number of years between each displayed index (year) to whatever you want.<br/> | ||
| + | Each band has its own _multiple variable. The defaults are:<br/> | ||
| + | $band1_multiple = 1; // This is multiplied by 10<br/> | ||
| + | $band2_multiple = 1;<br/> | ||
| + | $band3_multiple = 1;<br/> | ||
| + | $band4_multiple = 1; // This is multiplied by 10<br/> | ||
| + | Note that this is only for displaying the indices: It doesn't really affect anything.<br/> | ||
| + | <br/> | ||
| + | Example:<br/> | ||
| + | The default for band 2:<br/> | ||
| + | $band2_multiple = 1; // Index every single year<br/> | ||
| + | $band2_interval = 50; // 50 pixels for each year<br/> | ||
| + | You will then have the indices "... 1800 1801 1802 1803 ..." 50 pixels apart (1 x 50px) in your second band.<br/> | ||
| + | <br/> | ||
| + | Suppose you set:<br/> | ||
| + | $band2_multiple = 10 // Index every tenth year<br/> | ||
| + | $band2_interval = 10 // Ten pixels for each year<br/> | ||
| + | You will then have the indices "... 1800 1810 1820 1830 ..." 100 pixels apart (10 x 10px) in your second band. | ||
| + | |||
| + | === Setting the Timespans === | ||
| + | |||
| + | Setting the Timespans of bands 2 and 3 and width of the "window" in bands 1 and 4 | ||
| + | |||
| + | Note that the bands work in pairs: Bands 1 and 2 make one pair and bands 3 and 4 the other.<br/> | ||
| + | Band 4 works equivalent to band 1, and band 3 works like band 2.<br/> | ||
| + | <br/> | ||
| + | It seems like the workings of the Timeline is based on a screen or page that is somewhere around 1460 pixels wide. For testing, I widened my browser to that.<br/> | ||
| + | <br/> | ||
| + | <br/> | ||
| + | The _second_ band shows the personal events so I want it to show some more than one life-span. 146 years seems to be good, and 1460 can be evenly divided by it (=10).<br/> | ||
| + | It's also fine by mew to show indices every tenth year.<br/> | ||
| + | <br/> | ||
| + | So I begin by setting:<br/> | ||
| + | $band1_interval = 100; // Only temporarely. More about this later<br/> | ||
| + | $band2_interval = 10; // 1460 width shall cover 146 years = 10px per year (1460 / 146 = 10)<br/> | ||
| + | $band2_multiple = 10; // Display index every 10 years<br/> | ||
| + | |||
| + | [[file:Timelinesimile1.jpg]] | ||
| + | <br/><br/> | ||
| + | $band1_interval was temporarely set = 100.<br/> | ||
| + | When the page width is around 1460 pixels, the width of the "window" in band 1, can be set in % of the total width.<br/> | ||
| + | <br/> | ||
| + | But: If the page width is less than 1460 the displayed timespan will be smaller by propotions.<br/> | ||
| + | So if you want to plan for a 1024 pixels wide page, you have to multiply by 0.7 (1024/1460) to get the correct figure and keep the 146 year timespan in band 2.<br/> | ||
| + | 100% "window" = 70, 50% "window" = 35 etc.<br/> | ||
| + | An even smaller page needs an even smaller multiplicator to keep the timespan.<br/> | ||
| + | <br/> | ||
| + | Note: The "window" in band 1 will still cover the same timespan (= band 2) regardless of the width.<br/> | ||
| + | So if a 100% "window" covered 146 years, a 50% "window" will make the '''total''' timespan for band 1 = 292 years.<br/> | ||
| + | And a 25% "window" will make the total timespan for band 1 = 584 years etc.<br/> | ||
| + | <br/> | ||
| + | So I set:<br/> | ||
| + | $band1_interval = 50;<br/> | ||
| + | $band1_multiple = 5; // NOTE! This value is multiplied by 10! Also for $band4_multiple.<br/> | ||
| + | <br/> | ||
| + | Bands 3 and 4 work the same way where band 4 = band 1 and band 3 = band 2.<br/> | ||
| + | <br/> | ||
| + | It's possible to set the $band1_interval and $band4_interval > 100 (see the defaults).<br/> | ||
| + | The band 2 and 3 variables must then be set in another way to display correctly.<br/> | ||
| + | I have _not_ investigated how it works. | ||
| + | |||
| + | === My own modifications === | ||
| + | I suppose the user is using a screen that is 1280 pixels wide or more (my users almost never use a phone, guests can't reach the Timeline page).<br/> | ||
| + | Most of my users are also elderly people and I guess they don't use many big monitors. That's why I plan for a 1280 pixels wide page.<br/> | ||
| + | Should it be wider there is no problem; the displayed timespan will just be wider.<br/> | ||
| + | <br/> | ||
| + | 1280 / 1460 = 0.8767<br/> | ||
| + | So I have to multiply my figures by 0.8767<br/> | ||
| + | <br/> | ||
| + | I want the band 2 to display a timeline of something like 140-150 years.<br/> | ||
| + | 146 years used the value 10 and 10 x 0.8767 = 8.767<br/> | ||
| + | The Timeline can't calculate with decimals but rounds everything(?) up, so it's either 8 or 9.<br/> | ||
| + | 1280 / 9 = 142.222 = Great<br/> | ||
| + | So I set $band2_interval = 9 // 142 years in 1280 width<br/> | ||
| + | And I set $band2_multiple = 10 // Index every 10th year<br/> | ||
| + | <br/> | ||
| + | I want the "window" to be like 1/2 of the width so I set:<br/> | ||
| + | $band1_interval = 44 // 50% x 0.8767 = 43.835<br/> | ||
| + | And I set $band1_multiple = 2; // Index every 20th (!) year. NOTE: Times 10.<br/> | ||
| + | |||
| + | [[file:Timelinesimile2.jpg]] | ||
| + | <br/><br/> | ||
| + | For the external events (bands 3 and 4) I did want a somewhat different display for band 4.<br/> | ||
| + | Unfortunately the variable $band4_interval seems to have no effect, whatever value it's set to.<br/> | ||
| + | I set the variables to:<br/> | ||
| + | $band3_interval = 9; // Same as band 2<br/> | ||
| + | $band3_multiple = 10; // Same as band 2<br/> | ||
| + | $band4_interval = 44; // This value seems to have NO EFFECT?<br/> | ||
| + | $band4_multiple = 10; // Index every 100th (!) year<br/> | ||
| + | <br/> | ||
| + | It seems like the width of the "window" in band 4 cannot be set. It seems to always be 1/10 of the total width.<br/> | ||
| + | <br/> | ||
| + | After setting the height of the table to 480px (Admin >> Setup >> Chart settings) and the four _pct variables to:<br/> | ||
| + | $band1_pct = "10%";<br/> | ||
| + | $band2_pct = "50%";<br/> | ||
| + | $band3_pct = "30%";<br/> | ||
| + | $band4_pct = "10%";<br/> | ||
| + | my Timeline box looks like this (randomly selected person):<br/> | ||
| + | |||
| + | [[file:timelinesimile3.jpg]] | ||
| + | <br/> | ||
| + | /[[User:XerxX|Erik Hoppe]] | ||
| + | |||
| + | |||
| + | == Simile Timeline Settings bef TNG v11 == | ||
| + | |||
| + | {{TNG 10.1.3|and before}}{{TNG 7.0|and after}} | ||
| + | {{:Simile Timeline Settings}} | ||
| + | |||
| + | == Explain Links == | ||
| + | *[http://www.simile-widgets.org/wiki/Timeline_Event_Display Timeline Event Display] | ||
| + | *[http://www.simile-widgets.org/wiki/Timeline_EventSources Timeline Event Attributes] | ||
| + | *[[Pedconfig_help/de#Zeitstrahl_Diagramm|Simile Timeline (German)]] | ||
[[Category:Setup]] | [[Category:Setup]] | ||
Latest revision as of 09:58, 11 February 2018
TNG 7.1 adds the following new capability to the Chart Settings:
- default chart width
- Simile Timeline
Default Chart Width
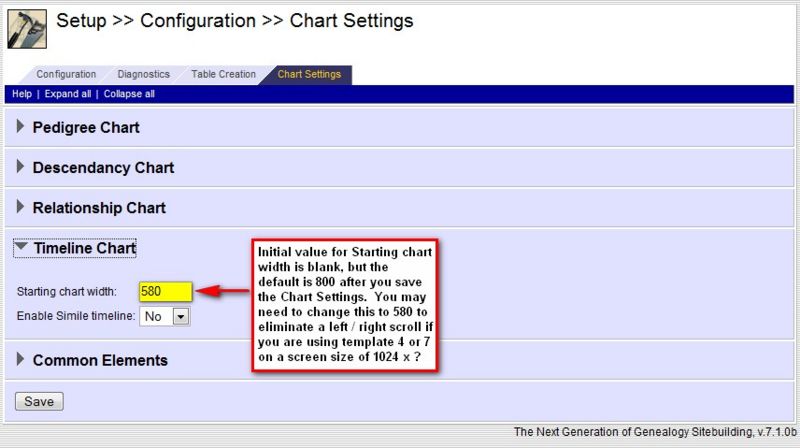
TNG 7.1 changed the default chart width for timelines from 500px to 800px. When you initially access the Timeline Chart within the Chart Settings, the field may be blank but once you save the settings it will change to 800.
If you are using Template 4 or 7 which have a left nav menu and your primary audience are using screens that are 1024px wide, you may want to change the default from 800px down to 580px to prevent a left/right scroll bar from generating.
Simile Timeline
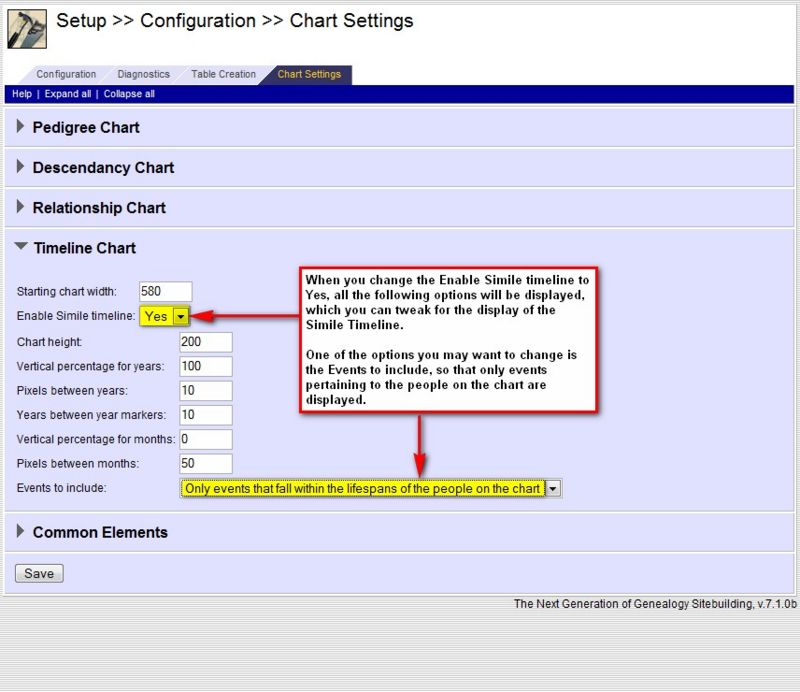
The default setting in the new Timeline section of Chart Settings is to not enable the Simile Timeline. So if you want to use the Simile Timeline, you will need to change the option to Yes.
Once you change the option to display the Simile Timeline, TNG will display additional options that can be changed.
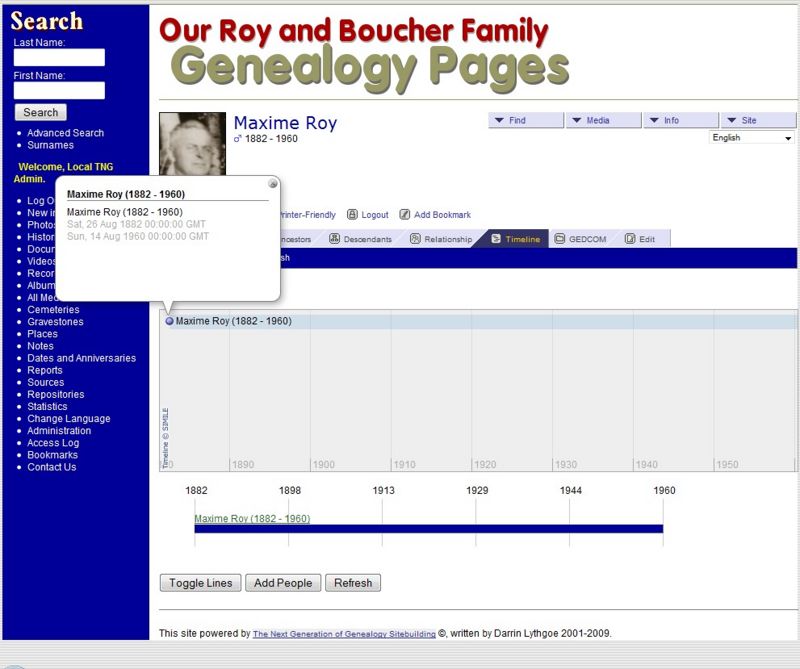
Note that if you do not have any Timeline Events defined, the Simile Timeline will not add any particular value to your Timeline page as can be seen in the following image.
Simile Timeline Settings from TNG v11
| TNG version: | ≥ 11.0.0 |
Overview
There are four moveable (by dragging) "bands" making up the Timeline:
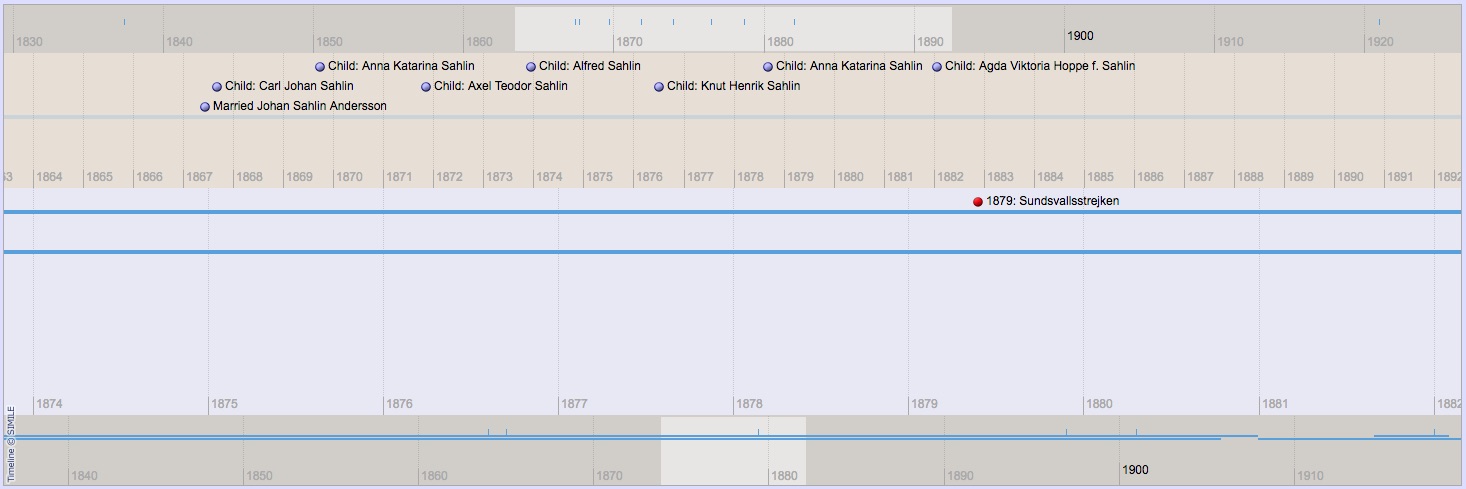
Band 1: Time overview for personal events. The light area is the "window" for Band 2.
Band 2: The personal events, the contents of the "window" of Band 1.
Band 3: The external events, the contents of the "window" of Band 4.
Band 4: Time overview for external events. The light area is the "window" for Band 3.
External events are added in Admin >> Setup >> Timeline Events.
NOTE: All settings are modified in the file timelineconfig.php
Band and Total heights
The height of the bands can be set in % of the total height (which is set in Admin >> Setup >> Configuration >> Chart Settings).
Each band has its _pct variable. The defaults are:
$band1_pct = "10%";
$band2_pct = "28%";
$band3_pct = "47%";
$band4_pct = "15%";
If you modify the values: Remember that they should add up to 100%!
The Timeline timespan
The width of the Timeline box is the free width of the page. So a wide screen gives many pixels and a narrow one gives fewer.
You can set how many pixels wide one year is, in bands 2 and 3. The more pixels, the fewer number of years will fit into the box, and vice versa.
Each band has its own _interval variable. The defaults are:
$band2_interval = 50;
$band3_interval = 175;
Regarding the bands 1 and 4 they work different in the way I have examined them.
More of this below.
The defaults are:
$band1_interval = 150;
$band4_interval = 150;
Displayed year indices
You can set the number of years between each displayed index (year) to whatever you want.
Each band has its own _multiple variable. The defaults are:
$band1_multiple = 1; // This is multiplied by 10
$band2_multiple = 1;
$band3_multiple = 1;
$band4_multiple = 1; // This is multiplied by 10
Note that this is only for displaying the indices: It doesn't really affect anything.
Example:
The default for band 2:
$band2_multiple = 1; // Index every single year
$band2_interval = 50; // 50 pixels for each year
You will then have the indices "... 1800 1801 1802 1803 ..." 50 pixels apart (1 x 50px) in your second band.
Suppose you set:
$band2_multiple = 10 // Index every tenth year
$band2_interval = 10 // Ten pixels for each year
You will then have the indices "... 1800 1810 1820 1830 ..." 100 pixels apart (10 x 10px) in your second band.
Setting the Timespans
Setting the Timespans of bands 2 and 3 and width of the "window" in bands 1 and 4
Note that the bands work in pairs: Bands 1 and 2 make one pair and bands 3 and 4 the other.
Band 4 works equivalent to band 1, and band 3 works like band 2.
It seems like the workings of the Timeline is based on a screen or page that is somewhere around 1460 pixels wide. For testing, I widened my browser to that.
The _second_ band shows the personal events so I want it to show some more than one life-span. 146 years seems to be good, and 1460 can be evenly divided by it (=10).
It's also fine by mew to show indices every tenth year.
So I begin by setting:
$band1_interval = 100; // Only temporarely. More about this later
$band2_interval = 10; // 1460 width shall cover 146 years = 10px per year (1460 / 146 = 10)
$band2_multiple = 10; // Display index every 10 years

$band1_interval was temporarely set = 100.
When the page width is around 1460 pixels, the width of the "window" in band 1, can be set in % of the total width.
But: If the page width is less than 1460 the displayed timespan will be smaller by propotions.
So if you want to plan for a 1024 pixels wide page, you have to multiply by 0.7 (1024/1460) to get the correct figure and keep the 146 year timespan in band 2.
100% "window" = 70, 50% "window" = 35 etc.
An even smaller page needs an even smaller multiplicator to keep the timespan.
Note: The "window" in band 1 will still cover the same timespan (= band 2) regardless of the width.
So if a 100% "window" covered 146 years, a 50% "window" will make the total timespan for band 1 = 292 years.
And a 25% "window" will make the total timespan for band 1 = 584 years etc.
So I set:
$band1_interval = 50;
$band1_multiple = 5; // NOTE! This value is multiplied by 10! Also for $band4_multiple.
Bands 3 and 4 work the same way where band 4 = band 1 and band 3 = band 2.
It's possible to set the $band1_interval and $band4_interval > 100 (see the defaults).
The band 2 and 3 variables must then be set in another way to display correctly.
I have _not_ investigated how it works.
My own modifications
I suppose the user is using a screen that is 1280 pixels wide or more (my users almost never use a phone, guests can't reach the Timeline page).
Most of my users are also elderly people and I guess they don't use many big monitors. That's why I plan for a 1280 pixels wide page.
Should it be wider there is no problem; the displayed timespan will just be wider.
1280 / 1460 = 0.8767
So I have to multiply my figures by 0.8767
I want the band 2 to display a timeline of something like 140-150 years.
146 years used the value 10 and 10 x 0.8767 = 8.767
The Timeline can't calculate with decimals but rounds everything(?) up, so it's either 8 or 9.
1280 / 9 = 142.222 = Great
So I set $band2_interval = 9 // 142 years in 1280 width
And I set $band2_multiple = 10 // Index every 10th year
I want the "window" to be like 1/2 of the width so I set:
$band1_interval = 44 // 50% x 0.8767 = 43.835
And I set $band1_multiple = 2; // Index every 20th (!) year. NOTE: Times 10.

For the external events (bands 3 and 4) I did want a somewhat different display for band 4.
Unfortunately the variable $band4_interval seems to have no effect, whatever value it's set to.
I set the variables to:
$band3_interval = 9; // Same as band 2
$band3_multiple = 10; // Same as band 2
$band4_interval = 44; // This value seems to have NO EFFECT?
$band4_multiple = 10; // Index every 100th (!) year
It seems like the width of the "window" in band 4 cannot be set. It seems to always be 1/10 of the total width.
After setting the height of the table to 480px (Admin >> Setup >> Chart settings) and the four _pct variables to:
$band1_pct = "10%";
$band2_pct = "50%";
$band3_pct = "30%";
$band4_pct = "10%";
my Timeline box looks like this (randomly selected person):
Simile Timeline Settings bef TNG v11
| TNG version: | ≤ 10.1.3 |
| TNG version: | ≥ 7.0 |
The screenshots below show the parameters modified by each setting. They also show settings that may be useful.
More detailed explanations are provided below.
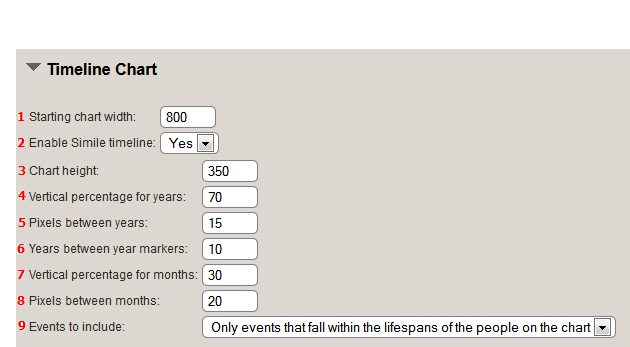
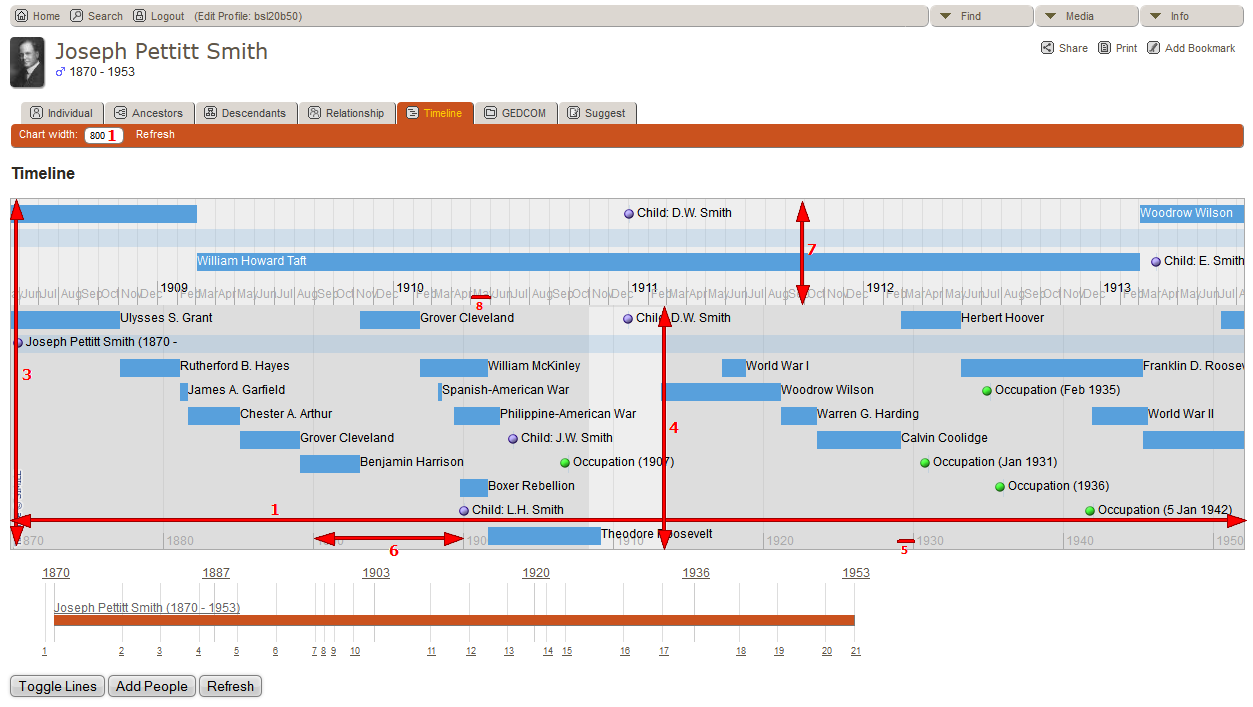
The Simile Timeline is made up of two timeline bands:
- Year band represented by number 4 in the image below
- Month band represented by number 7 in the image below, which is displayed below the year band in TNG V8 and above the Year band in TNG V9
1. Starting chart width
This is the width in pixels of the small bar timeline below the Simile timeline. The Simile timeline resizes based on the size and resolution of the viewing screen. This is the only parameter that can also be modified by a site visitor. Depending on the resolution of the monitor that is used to view the timeline, a larger or smaller chart width may be appropriate. If the timeline width exceeds the width and resolution of the screen used to view the timeline, scroll bars will need to be used to view the entire timeline.
2. Enable Simile timeline
To use the Simile timeline, select 'Yes'. If this option is set to 'No', only the small timeline bar will be displayed with lines hyperlinked to the corresponding timeline event.
3. Chart height
This setting determines the total height in pixels of the timeline chart. If the chart height is set too large, there will be wasted empty space at the bottom of the chart. If it is set too small, events will fall off of the chart and won't be visible.
4. Vertical percentage for years
This setting determines the vertical percentage of the timeline chart that represents the lower, or 'years' portion of the timeline chart. This setting plus the Vertical percetage for months should add up to 100. Going above 100% will push part of the chart outside the visible bounds of the chart. Conversely, if these two settings total less than 100%, the two sections will not fill the bounds of the chart and you will end up with a third blank section at the bottom (if the chart height is not sufficient, events that fall off the chart will overlap this blank section). Setting the vertical percentage for years to zero will eliminate the 'year' portion of the Simile timeline. Likewise, setting 'vertical percentage to months' to zero will eliminate the 'months' portion of the Simile timeline.
5. Pixels between years
This setting determines the number of pixels between years in the lower portion of the Simile timeline. The width of the Simile timeline divided by this setting determines how many years are spanned by the lower portion of the Simile timeline. The screen resolution along with the template used determine the full width of the Simile timeline, so some judgement and calculation should be used to determine the best setting to use here. For example, if a screen has a resolution of 1440 x 900 and TNG is using template 7, which uses a side menu, you end up with a Simile timeline that is pretty close to 1200 pixels wide. If the 'pixels between years' is set to 15 on in this case, the lower portion of the Simile timeline will encompass 80 years. If everything is the same, but template 8 (which does not use a side menu) is used, the lower portion of the Simile timeline will encompass about 93 years (1440 minus a few pixels for padding divided by 15).
6. Years between year markers
This setting determines the interval between markers on the Simile timeline. For example, if this is set to 10, there will be a line and the year every decade (i.e. 1870, 1880, 1890, etc.). If this setting is too small, the markers will be too close to read the years.
7. Vertical percentage for months
This setting determines the vertical percentage of the timeline chart that represents the upper, or 'months' portion of the timeline chart. This setting plus the Vertical percentage for years should add up to 100. Going above 100% will push part of the chart outside the visible bounds of the chart. Conversely, if these two settings total less than 100%, the two sections will not fill the bounds of the chart and you will end up with a third blank section at the bottom (if the chart height is not sufficient, events that fall off the chart will overlap this blank section). Setting the vertical percentage for years to zero will eliminate the 'year' portion of the Simile timeline. Likewise, setting 'vertical percentage to months' to zero will eliminate the 'months' portion of the Simile timeline.
8. Pixels between months
Similar to setting #5 above, this setting determines the number of pixels between months in the upper portion of the Simile timeline. The width of the Simile timeline divided by this setting determines how many months are spanned by the upper portion of the Simile timeline. The screen resolution along with the template used determine the full width of the Simile timeline, so some judgement and calculation should be used to determine the best setting to use here. For example, if a screen has a resolution of 1440 x 900 and TNG is using template 7, which uses a side menu, you end up with a Simile timeline that is pretty close to 1200 pixels wide. If the 'pixels between months' is set to 20 on in this case, the upper portion of the Simile timeline will encompass about 60 months or 5 years.
9. Events to include
This setting determines whether to include all timeline events in the Simile timeline or only those events that fall within the person's lifetime. If the option is chosen to only show those events that fall within a person's lifespan, more events will appear on the Simile timeline by adding more people to the timeline.
